Steganography in USB mass storage devices

I have always feel a deep interest in steganography, the art of concealing information inside information. Not surprisingly, steganography is probably as old as cryptography with the first recorded use of it done by Demaratus, king of Sparta.

With the advent of the digital era and the massive data sizes we handle, steganography is being a very important field for researchers. Most of the more common digital steganography is done in image files because they are a very good container, being the LSB (Less significant bit) replacement the simplest technique, which allows to hide information inside a image with a minor alteration that can’t be noted by the human eye.

But steganography using digital images is not the only way of hide digital information. There are steganography in, practically, every corner of the digital word, even in TCP/IP packets! I am going to describe some ways to conceal information in USB mass storage devices that use FAT32 (most of them). These techniques allow to hide information that is not going to be shown by regular file explorers (except the last example which is probably not a truly steganography scheme but I thought it was a cool addition) and they are not going to delete any other user data. Although described here in a briefly and basic manner, they can be used in sophisticated schemes to hide data.

1) Information in the Boot sector
The first sector is called Master Boot Record (MBR), it contains information about different partitions and, more importantly for our purposes, executable code to be used when the unit is bootable.

master_boot_record (1)

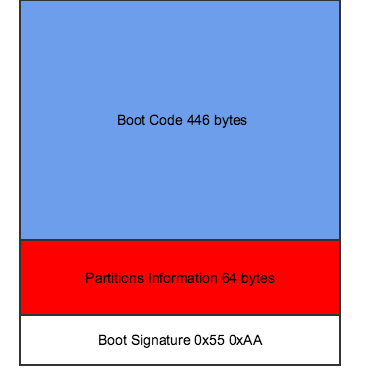
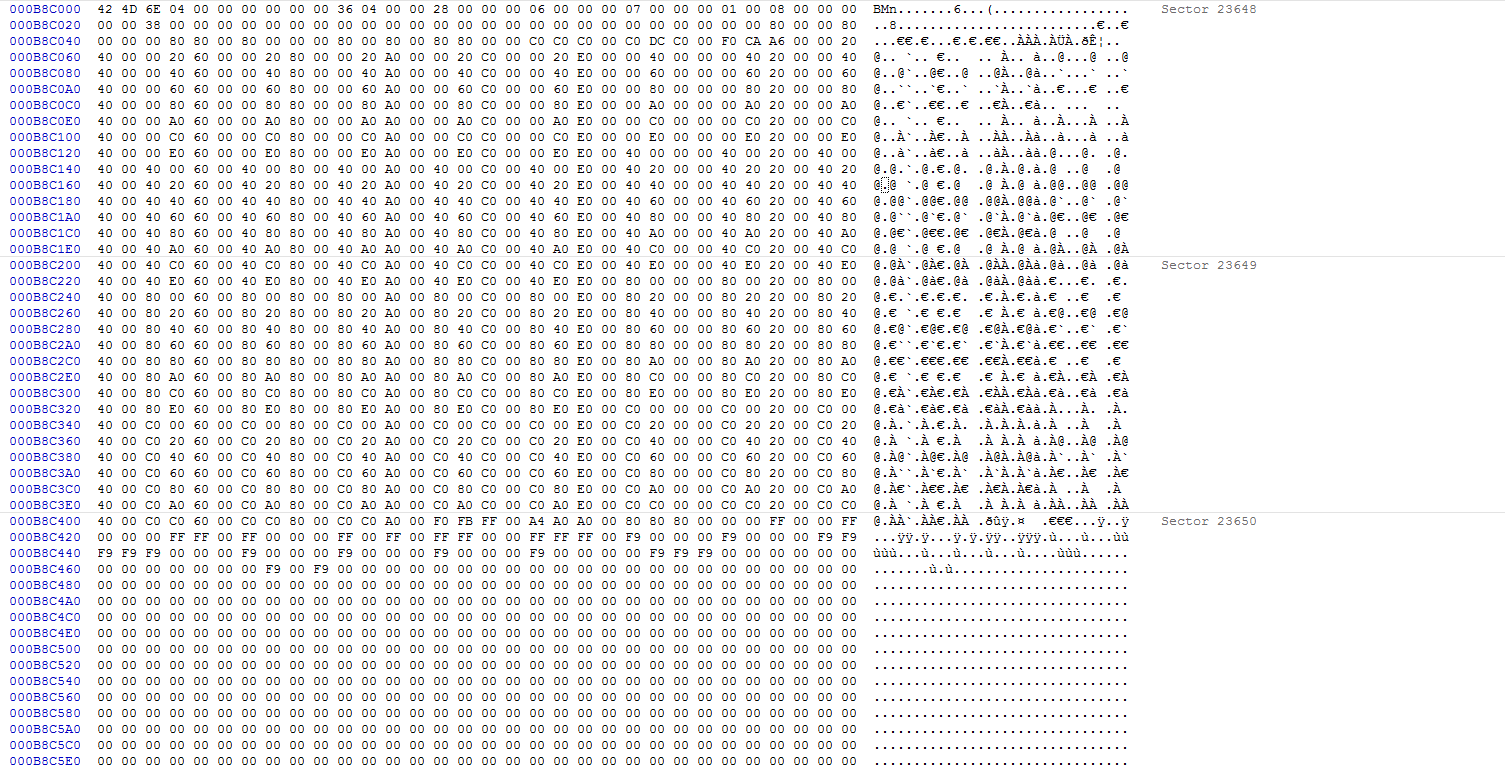
If the USB drive is not bootable, that part of the first sector is not used, those are 446 bytes to store information that is not going to be readable from a common file explorer.

2) EOF (End of file) occultation
Files are stored in one or more clusters (each of them usually of 4k, but they can be up to 32k or as small as a single sector) conveniently linked in the FAT. If we have, for example, a single file that weighs 1024 bytes, it would be stored in a single cluster with the remaining 3072 bytes not available for any other allocation. The remaining bytes are a good place to hide information.

raw bmp
Example of a bmp file that only requires three sectors of a 8-sector cluster to be stored, leaving most of the last sector used and five more available to store more information.

3) Information encoded in the FAT
As previously mentioned, files are composed by a one or more clusters that are referred by a 32-bit (28 bits used) number. Those clusters can be located through the FAT (File Allocation Table), that contains a linked list of cluster entries for each file.

fat_demostration
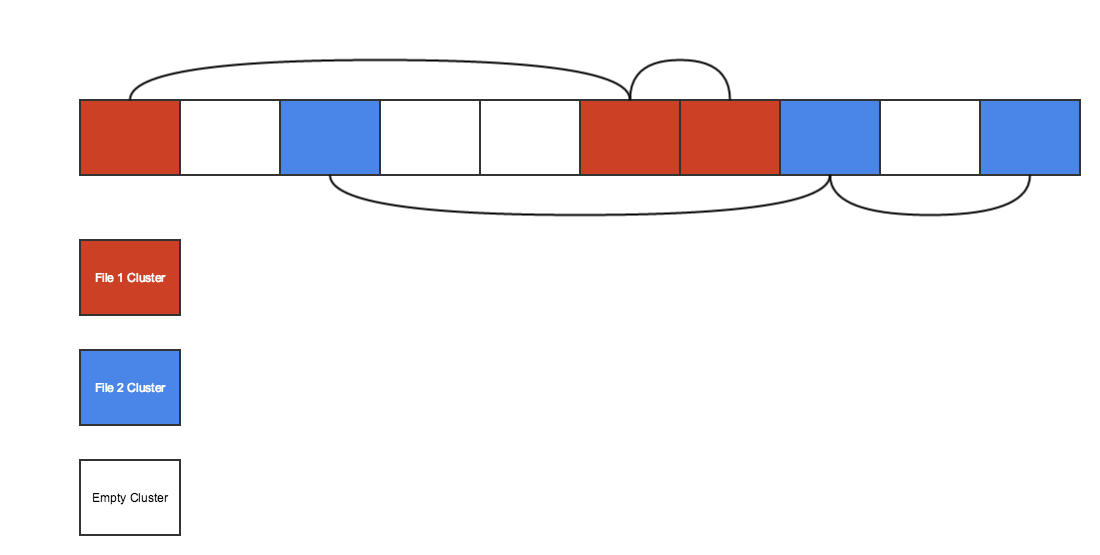
Simple example of how two files and their clusters could be located in a portion of the FAT.

As shown in the previous figure, cluster entries doesn’t need to be contiguously allocated. Systems tend to allocate those entries contiguously for efficiency but in this case we are going to handle the allocation in a different way. We are going to put every cluster entry in well-thought distance from one of them that will be the reference. This way we can assign values to different distances, coding information on those distances!

fat_codification
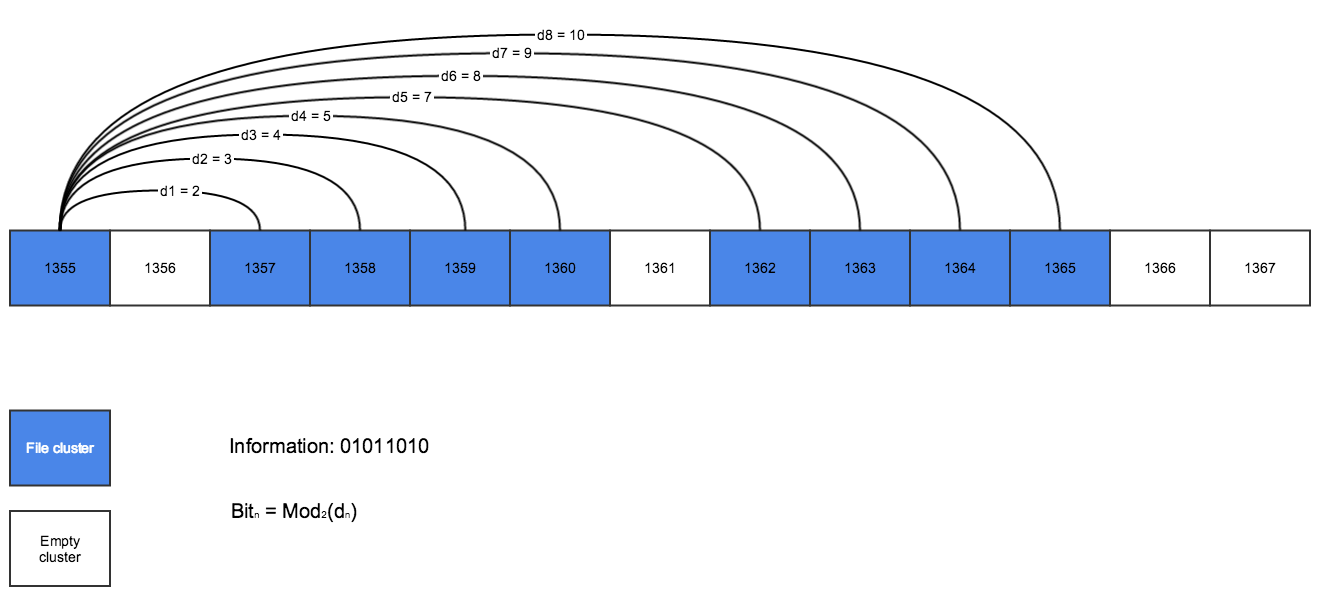
A single byte coded in a file of nine clusters

In this simple example a single byte is coded using the Modulo-2 operator in every distance from the first cluster. Giving these results:

Bit7 = Mod2(d1) = 0
Bit6 = Mod2(d2) = 1
Bit5 = Mod2(d3) = 0
Bit4 = Mod2(d4) = 1
Bit3 = Mod2(d5) = 1
Bit2 = Mod2(d6) = 0
Bit1 = Mod2(d7) = 1
Bit0 = Mod2(d8) = 0

Different Modulo operations can be done to code more info, for example Modulo-256, that would code more info in fewer cluster entries but the file will be more fragmented.

fat_codification_255
Eight bytes coded in a eight file using a Mod-256 operator on the distance between cluster entries. Note that, in this examples, distances are measured from the previous cluster. If one of the distances needed for coding one byte is occupied by other file, the next valid distance will be dn + 255, next dn + 255 * 2 … with a generalized form of dn + 255 * k for k= 1, 2, 3…

Applying those techniques to a real file of 256Mb, which using a cluster size of 4k will use 65536 clusters, will achieve 8191 bytes of hidden information using Mod-2 operator or 65535 bytes using the Mod-256 operator. This technique sacrifices efficiency in order to get better concealment of the information. Besides that, more  schemes can be done like reducing the cluster size, using a reduced alphabet if possible, compressing the concealed information with the Huffman algorithm or even using more advances techniques that I don’t really can grasp 🙂

A potential problem that could arise would be an auto-defragmention of the media by the operating system but usb drives almost always use flash technology which, in the first place, doesn’t gain as much as the old hard drives from defragmentation and also discourages write operations because write cycles are not unlimited. For those reasons is not probable that a modern OS would perform an auto-defragmentation of a USB flash drive device.

4) Using the Short File Name legacy feature
If you were on the computers during the 80’s and early 90’s you will remember that file names in the different FAT systems were limited to the 8.3 filenames format. With the development of the FAT32 systems, support for longer names was added without ignoring retro-compatibility.


The content of a folder with both the long names and the short names listed. When a long name is needed the short name is a really a hash that identifies uniquely the file.

If  we have a file named “preguntas_frecuentes.pdf” windows will generate the short name “PREGUN~1.PDF”. If we create a second file named “preguntas_frecuentes_2.pdf” the short name will be PREGUN~2.PDF “.

During development of Pincho, a USB Mass Storage Library for Android, for the sake of simplicity, I refused the mess of having to generate well-built short filenames (I shouldn’t let pass the chance to present you this amazing article about 8.3 filename and its checksum ) adding a long file entry in every case, even if the file don’t really need it. I found some surprises:

1) Even if a long filename entry is added before the normal file entry Windows would ignore it if the name length is less or equal than eight. A long filename entry with the name “FiLeS” will be ignored and show as “FILE” in the file explorer.
2) Short filenames doesn’t need to be created from the long filename.
3) In order to force Windows to read the long filenames, the short filenames must be interpreted by the OS as truncated.


A folder written by Pincho library. The short names are created randomly except the tilde character in the 7th position and the last number in order to force Windows to treat them as truncated

The first six characters of the short name could be used to store information, creating for example 30 files would allow to store 180 bytes of information. Short filenames are not listed by default but it is possible using the “dir \x” command. In order to use this approach in a useful way cryptography should be used too but many people doesn’t seem aware of this little legacy feature that still survives 🙂

If I come up with other schemes that would be interesting I will post them here.

Happy crafting! 🙂

Advertisement

(1) Adding a cache system in Pincho library. Probably the simplest cache

Usb Mass Storage devices usually use the FAT32 filesystem, which it kind of surprising due to how old FAT32 is but it lasts because FAT32 is Win, OSX and Linux compatible and not very difficult to implement in embedded devices.

FAT32 solved some limitations from previous FAT versions as limited file names and file sizes but still uses, as it names implies, a file allocation table to find the cluster that define a file.

fat_demostration
FAT32 uses a linked list to allocate clusters for a given file as shown here. Clusters entries doesn’t need to be adjacent and one entry can point to a previous entry.

That simplicity comes with a cost, a Θ(n) cost to be exact, because you must traverse the FAT to find a empty cluster. For this reason FAT32 and other linked-list filesystems does not scale very well.

I was aware of this while developing Pincho but it shocked me when I started the first tests. While read operations performs pretty decent, write operations using a naive approach are painfully slow and it gets worse when the USB mass storage device gets crowded with files.

fat_allocation
A extremely best case scenario of an allocation of three files that require three clusters.Although this portion of the FAT looks empty from the last inserted file that can’t be supposed in a real scenario because fragmentation. Allocation is this scenario will be Θ(3n), note that allocation is linear, as previously shown but a constant appears, that is equal to the number of clusters the file will use. In a fragmented device, allocation will be even slower

The way to fight with this issue is through caching. Caching is a world itself, with a lot of algorithms and approximations. An aggressive caching will use a lot of memory to store the state of most of the FAT to minimize the I/O operations but Android heap is limited, also consistency must be guaranteed between data in the cache and data in the device and that adds some complexity.

Pincho library is still in kind of experimental state so I would like to try different caching approaches. The first I implemented is probably the simplest, not by far the best, but it gets some improvements. It is simple and it has a small memory footprint.

This implementation assumes correctly that what we want to minimize the number of I/O operations. Storage devices are usually accessed in blocks, called sectors, of 512 bytes addressed by a 32-bit direction called Logic block addressing (LBA). Sectors that compose the FAT can store 128 cluster entries. Those sectors with enough free entries (What is enough must be decided, If sectors with just a few free entries are cached it may not be a good speed improvement) are stored in an Array, that guarantees that an I/O operation on the FAT will return at least some of the free clusters needed to store a file, avoiding traversing the filled parts of the FAT.
I have defined three levels, the low cache just cache enough space to store 100 mb of data, the medium cache try to cache good sectors of half of the cache and the high cache good sectors of the whole FAT. The main difference between these modes is the time needed to perform the cache.

It is an improvement but there is a lot of room for more improvements. For the next releases I have planned to add more sophisticated caching systems.

Happy coding!

Pincho: A USB Mass storage Android implementation without ROOT v0.1

Source code
Download the AAR file

Somedays ago I released a very simple app to transfer files between your phone and a USB Flash drive. Kind of a proof of concept but the most interesting is not the app itself, it is the library that powers it. I had very positive experiences releasing another library that handle USB to Serial chipsets without needing a rooted phone so I am excited to release this new open-source(MIT License) USB mass storage library for Android as Pincho (silly spanish name we use to name the USB sticks).

Overview
Pincho’s main objective is not only to handle the upper layer of the USB Mass storage stack (FAT32 at this moment). Also exposes the SCSI commands layer and even the Bulk-Only transport protocol.
USB connected devices must implement, besides the obvious Mass Storage class, the 0x06 subclass (SCSI protocol) and the 0x50 protocol (Bulk-Only).
Currently Pincho only supports FAT32 filesystem and a maximum of 4 partitions (Extended partitions still not supported).

Add Pincho to your Android project
The easiest way to use it right now is copying the .aar file to the libs folder and adding these lines in your build.gradle file.

dependencies {
// Other dependencies...
compile project(':usbmassstorageforandroid-release')
}

Virtual FileSystem methods
Although Pincho currently only implements FAT32, there is a defined class to abstract it. Adding new filesystems wouldn’t have to affect drastically previous written code. Here are the basic methods

UsbDevice mDevice;
UsbDeviceConnection mConnection;

// choose the device and initialize mConnection through UsbManager.openDevice(UsbDevice mDevice);
// http://developer.android.com/guide/topics/connectivity/usb/host.html

/*
* Constants
*/
public static final int CACHE_NONE = 0; // No cache
public static final int CACHE_LOW = 1; // Cache for a 100 Mbytes allocation
public static final int CACHE_MEDIUM = 2; // Cache half of the FAT
public static final int CACHE_HIGH = 3; // Cache the whole FAT

/*
* Constructor definition
*/
public VirtualFileSystem(UsbDevice mDevice, UsbDeviceConnection mConnection);

/*
* Mount operation, return true if device was successfully mounted. BLOCKING OPERATION
*/
public boolean mount(int index);

/*
* Mount operation, return true if device was successfully mounted. BLOCKING OPERATION*
* cacheMode: 0 no cache, 1 low cache, 2 medium cache, 3 high cache.
*/
public boolean mount(int index, int cacheMode)

/*
* List only file names, return a List of Strings. NON BLOCKING OPERATION
*/
public List<String> list();

/*
* List complete information of files, return a List of VFSFile objects. NON BLOCKING OPERATION
*/
public List<VFSFile> listFiles();

/*
* Get current path, return a string linux-like formatted with the current path. NON BLOCKING OPERATION
*/
public String getPath();

/*
* Change dir specified by a name, folder must be inside the current folder, return true if operation was * ok. BLOCKING OPERATION.
*/
public boolean changeDir(String dirName);

/*
* Change dir specified by a VFSFile, folder must be inside the current folder, return true if operation was ok. BLOCKING OPERATION.
*/
public boolean changeDir(VFSFile file);

/*
* Change dir back, return true if operation was ok. BLOCKING OPERATION
*/
public boolean changeDirBack();

/*
* Write file, return true if file was written correctly. BLOCKING OPERATION
*/
public boolean writeFile(File file); //java.io.File 

/*
* Read file specified by a string, return an array of bytes. BLOCKING OPERATION
*/
public byte[] readFile(String fileName);

/*
* Read file specified by a VFSFile, return an array of bytes. BLOCKING OPERATION
*/
public byte[] readFile(VFSFile file);

/*
* Delete file specified by a string, return true if file was deleted. BLOCKING OPERATION
*/
public boolean deleteFile(String fileName);

/*
* UnMount the USB mass storage device, return true if was unmounted correctly. BLOCKING OPERATION
*/
public boolean unMount();

File data is encapsulated in VFSFile class

public class VFSFile
{
    private String fileName;
    private boolean isReadOnly;
    private boolean isHidden;
    private boolean isSystem;
    private boolean isVolume;
    private boolean isDirectory;
    private boolean isArchive;
    private Date creationDate;
    private Date lastAccessedDate;
    private Date lastModifiedDate;
    private long size;
}

SCSI Interface
Pincho also allows you to call directly a number of SCSI calls which gives a lot of raw power. SCSI calls are used through a class SCSICommunicator that implements a buffer to queue every call so they are non-blocking. Current implemented calls are:

– Inquiry
– ReadCapacity10
– Read10
– RequestSense
– TestUnitReady
– Write10
– ModeSense10
– ModeSelect10
– FormatUnit
– PreventAllowRemoval

In order to receive any notification about a current SCSI operation a callback must be defined

private SCSIInterface scsiInterface = new SCSIInterface()
{
    @Override
    public void onSCSIOperationCompleted(int status, int dataResidue)
    {
      // status 0: completed successfully
      // status 1: Some error occurred
    }

    @Override
    public void onSCSIDataReceived(SCSIResponse response)
    {
       // Data received in the data-phase.
       // Possible responses: SCSIInquiryResponse, SCSIModeSense10Response, SCSIRead10Response,
       //     SCSIReadCapacity10, SCSIReportLuns, SCSIRequestSense
    }

    @Override
    public void onSCSIOperationStarted(boolean status)
    {
      // SCSI operation started
    }
};

Create the SCSICommunicator object

SCSICommunicator comm;
comm = new SCSICommunicator(mDevice, mConnection);
comm.openSCSICommunicator(scsiInterface);
//..
//..
//..
comm.closeSCSICommunicator();

And call whatever SCSI call you need. SCSI calls are particularly tricky as they have a lot of parameters and some of them are kind of obscure. Although I have in mind writing about them eventually Here is a good source of information about SCSI calls.

public void read10(int rdProtect, boolean dpo, boolean fua,
                   boolean fuaNv, int logicalBlockAddress,
                   int groupNumber, int transferLength)

public void requestSense(boolean desc, int allocationLength)

public void testUnitReady()

public void write10(int wrProtect, boolean dpo, boolean fua,
                    boolean fuaNv, int logicalBlockAddress, int groupNumber,
                    int transferLength, byte[] data)

public void modeSense10(boolean llbaa, boolean dbd, int pc,
                        int pageCode, int subPageCode, int allocationLength)

public void modeSelect10(boolean pageFormat, boolean savePages, int parameterListLength)

public void formatUnit(boolean fmtpinfo, boolean rtoReq, boolean longList,
                       boolean fmtData, boolean cmplst, int defectListFormat)

public void preventAllowRemoval(int lun, boolean prevent)

Improvements
There is a lot of room for improvements. I am totally open to hear your thoughts about this. Some of the pending enhancements are:

– Implement a Caching system. Reading is not particularly slow as Pincho knows what LBA has to read to find the next cluster node in the FAT but writing is slower than it should be.
– Not every SCSI call is implemented.
– Support extended partitions.
– More asynchronous interface in VirtualFileSystem to do not have to worry about blocking operations. Defining a callback to receive notifications and data.
– Other Filesystems could be eventually added.

Update 08-19-15: A primitive cache added

There are probably more important things that I am missing so if you find them please let me know.

Happy coding 🙂

How to connect a USB Flash drive to your Android phone without root and transfer files? Here’s the app

Download the app!

Since I released DroidTerm and the library which powers it I have been working in another project using the Android USB api. I am happy to announce the first part of that project.

USB Flash Drive File Transfer is an Android app that allows you to hook up a USB Flash drive and transfer files between them without the need to have a rooted Android phone.

Screenshot_2015-07-28-12-41-32

The UI is simple, the upper grid shows the files in your SD and the lower the files in your USB. Just drag and drop files to transfer them. USB Flash drives must be formatted as FAT32 but it is the more common filesystem in USB Flash drives

Screenshot_2015-07-28-12-43-10

The app is pretty simple but if you are technically savvy the library working behind the scenes is far more interesting. It handles the USB mass storage stack (FileSystem, SCSI and Bulk-Only protocol) from the user-space, and I will release it in some days as open-source. So if you are interested stay tune! 🙂

It is still an early version. Some operations are still slower that they should be but I am working on improvements. If you find other errors and/or suggestions I would love to hear about them 🙂

DroidTerm 6.5 now supports for Arduino clones using CH340/CH341 chipsets

Last information about the current state of DroidTerm. Please check it out

As title says, I’ve managed to add support in DroidTerm and UsbSerial for those cheap Arduino clones which use the Ch34x family usb to serial chipsets (thanks Paul for providing me with one).
Screenshot_2015-05-09-19-39-32
Besides of that. I fixed two bugs:
– A bug that appeared when a CDC device connection was disconnected and reconnected without unplugging.
– Now DroidTerm keeps logging data (if a profile was created) when the screen is turned off.

I hope DroidTerm is still useful for you guys and I hope I could start to add some new features soon.

Farewell!

The signed Java madness: A little workaround to fake unsigned types in Java

As everyone probably knows, there is no unsigned types in the java programming language. The primitive types java provides us are:
Byte: one byte signed (-128…+127)
Short: two bytes signed (-32,768…+32,767)
Int: four bytes signed (-2147483648…+2147483647)
Long: eight bytes signed (-9223372036854775808…+9223372036854775807)

Ok, I admit short, int and long as signed values is not as bad as it seems as most of the time you would use it signed. But signed byte is something it escapes from my understanding. I read the main designers of the java language were looking for simplicity but removing the “unsigned” keyword just cripples the language in my humble opinion.

When the problem is the range is usually not a big deal if there is at least one bigger type available to cast. It is a waste of space though and sometimes that matters.

There is another problem more uncommon but it freaked me out (that’s why i am rambling here :))

Dealing with signed types would add complexity to the project
I see this problem very common if you are working with low level apis (a java wrapper of libusb, a Bluetooth library…) which returns data in form of raw bytes and handling them as signed will cause pain.

For example, let’s say we are getting a stream of bytes representing a LBA from a connected mass storage device

byte[] lbaData = usb.getLba(); // 4-bytes Little-Endian
int lba = (lbaData[3] << 24) +  (lbaData[2] << 16) + (lbaData[1] << 8) + lbaData[0];
// Example of data:
// lbaData: 0x80, 0x1F, 0x00, 0x00
// int lba = 7808
// As a unsigned int would be 8064

Using this code we are going to deal with an amazing LBA range which contains negative values and although it could be handled, it is not “natural” (addresses are always represented as positive) and adds more complexity and proneness to error. A simple cast between types does not solve anything because byte type is signed so we are stuck with the same negative values.

To solve this little but annoying problem we need use the simple solution used when range was not enough and dust off our notes from University to remember how negative numbers are represented at bit level.

  private final static long MAX_UNSIGNED_INT_VALUE = 4294967296L;

  public long intToUlong(int value)
  {
      if(value < 0)
      {
          long complement2Value = (~((long) value) + 1);
          return MAX_UNSIGNED_INT_VALUE - complement2Value;
      }else
      {
          return value;
      }
  }

  public int UlongToInt(long value)
  {
      if(value <= MAX_UNSIGNED_INT_VALUE)
      {
          if(value >= MAX_UNSIGNED_INT_VALUE / 2)
          {
              return (int) (~(MAX_UNSIGNED_INT_VALUE - value) + 1);
          }else
          {
              return (int) value;
          }
      }else
      {
          throw new IllegalArgumentException("Value out of range for a int");
      }
  }

This is a little example of two methods to fake correctly an int to a unsigned long an vice versa. Here it is the whole class with more conversions although algorithmically are the same with the exception of the max unsigned value

It seems Java 8 added support for some unsigned types and that is really nice. Unfortunately (or Fortunately) my java coding is limited to Android platform so those niceties are not yet available.

Hope you find it useful and happy coding! 🙂

A dirty and quick example of serial port communication in Android

Since I released UsbSerial I have received good feedback about its performance but I also have received messages with some legit doubts about how to use it. I finally overcame laziness and I have publish a little example of how to use UsbSerial correctly in a real app. Here it is the source code, just two java source code files 🙂

Disclaimer: If you are looking for a serial terminal for Android, DroidTerm is what you need, this is just a quick example

An overall description of how it works:
– UsbService.java contains a Service to isolate all Usb operations. Interesting things happens there. If you need to change baud rate, stop bits and son those lines are located there. It is a good pattern to implement open connections in a Service so I encourage you to do it this way.

– When App starts, UsbService is created and will try to connect with an attached usb device. if there is one device compatible it will connect with it and data will be able to be sent and received. If no devices are attached, it will inform the user through a toast. The app will be still listening for new usb attached devices.

– Data received will appear in the white box, Send button will send the data wrote into the EditText.

Screenshot_2015-01-09-17-52-48

Although pretty simple and it does not have any particular goal (besides being an explanatory app), it could have some bugs so If you find something just let me know opening an issue on github.

Happy coding!

DroidTerm v6.2 USB Serial port for Android

Last information about the current state of DroidTerm. Please check it out

I start this new year with a new DroidTerm update. Every month this little utility is getting more and more useful and reliable. Today I am going to present two new features I added some weeks ago but I didn’t document anywhere.

-Profile logs
Since v5.0 DroidTerm allows to create connection profiles avoiding annoying configuration setup each time you connect your devices.
Screenshot_2014-10-16-21-34-44
DroidTerm v6.2 creates a log file each time a connection profile is created and that file is updated (opened, written and closed, so synchronization with cloud services like Dropbox is possible) every time something is received. It is still possible to save logs the same way, even if you are working within a connection profile.

Keyboard input options
DroidTerm v6.2 has an option to change the way it sends an end of line. There are three options
Screenshot_2015-01-05-17-49-15

New year proposals
Like loosing weight and giving up smoking, I am thinking about a couple of major improvements I should do as a new year proposal. One of them is a kind of scripting language(and a graphic interface to code easily from the device) and the other is adding support to emulate ANSI escape codes (VT100). Just proposals 🙂

WinUsbPy: A python wrapper over WinUsb v0.1

WinUsbPy is a python wrapper over WinUsb, it basically allows handling a usb device without the need of installing a kernel driver. Although You still have to install a generic driver. I needed raw access to that library using Python, I found this but it looks more oriented to HID devices. So, as I usually do, I coded my own solution.

Two Layers
WinUsbPy can used in two different ways:
– Using a 1:1 wrapper over WinUsb, which it means the programmer knows about C/C++, WinUsb and ctypes (of course you know python if you are reading this 🙂 )

– Using a high level api with more methods but pretty straightforward because it hides complexities mentioned above

Low Level Api:

#args: arguments of the C++ function called
def exec_function_winusb(self, function_name, *args):
def exec_function_kernel32(self, function_name, *args):
def exec_function_setupapi(self, function_name, *args):

Each function invokes functions from a different dll.
For example if we want to call SetupDiGetClassDevs

from winusbpy import *
from ctypes import *
from ctypes.wintypes import *
from winusbclasses import DIGCF_DEVICE_INTERFACE, DIGCF_PRESENT

api = WinUSBApi()
byte_array = c_byte * 8
guid = GUID(0xA5DCBF10L, 0x6530, 0x11D2, byte_array(0x90, 0x1F, 0x00, 0xC0, 0x4F, 0xB9, 0x51, 0xED))
flags = DWORD(DIGCF_DEVICE_INTERFACE | DIGCF_PRESENT)

hdev_info = api.exec_function_setupapi("SetupDiGetClassDevs", byref(guid), None, None, flags)

High Level Api
Check the README for a complete description, but let’s compare how to send a control request using both apis

#Low level api
api.exec_function_winusb("WinUsb_ControlTransfer", handle_winusb, pkt1, byref(buff), c_ulong(1), byref(c_ulong(0)), None)

#High level api
api.control_transfer(pkt1, buff=[0])

Much simpler!

I wouldn’t dare to call it a stable version so I labeled 0.1. Give it a try if you want! 🙂

Repository
Complete example using low level api.
Complete example using high level api

UsbSerial: A serial port driver library for Android v4.5

Although I talked some months ago about this library and I even use it for DroidTerm, DroidTerm PRO and other professional projects, the post I wrote no reflects the truly current state of this work. It is fairly stable and has been used So here it is, a more formal and helpful description of UsbSerial for Android.

A brief list of Apps and wrappers using UsbSerial. Contact with me if you have a nice project to show 🙂

UsbSerial repository

If UsbSerial fits your needs and have help you with your project, please consider donating via PayPal to boost further improvements

If you are relatively new using Android, or just Usb Android api just checkout this simple app using UsbSerial with full source code available on Github

Or you can check out this amazing post about using the USB android API by the guys of BLECentral. The previous steps to use UsbSerial are very well explained there.

Another awesome tutorial by Hariharan Mathavan from All About Circuits

How to add UsbSerial to your project
Thanks to StephaneBg UsbSerial can be easily added to your Android Studio project via Jitpack. First add the jitpack repo into your project build.gradle.

allprojects {
    repositories {
        jcenter()
        maven { url "https://jitpack.io" }
    }
}

And then add the dependency to your module’s build.gradle

compile 'com.github.felHR85:UsbSerial:4.5'

Devices supported
Currently UsbSerial supports three of the most used USB to serial chipsets:
FTDI FT232 (I am not going to brick your device, trust me 🙂)
Silicon Labs CP210x
Prolific PL2303HX (at least HX version)
CH340/CH341
A new feature added here is a CDC generic driver, so it should be possible to connect devices which fits into Communications Device Class. I am open to suggestions about new supported chipsets.

UsbSerial internals: A brief description
– Internally UsbSerial works as a Producer-Consumer handler,  what you write is put into a buffer and it will be consumed by a Consumer thread when previous data is sent.

– Write operations can be queued from multiple threads without problems

– Received data is received through a callback, there is no need to be polling.

– Two 16kb internal buffers for Write and Read operations.

– Android 4.2.1  or greater devices rely on Asynchronous USB api for read operations. Prior versions (Android 3.1 oldest version supported) use synchronous api due to some Android bugs. Write operations use always synchronous USB api. UsbSerial handles all of this so there is no need to worry.

– PL2303, FT232 and CP210x drivers use a list of known vid and pids to identify a correct device.

– CDC driver can be loaded automatically for a device if it has a CDC interface.

How to use it
First of all you need both UsbDevice and UsbDeviceConnection objects correctly initialized.

// This snippet will open the first usb device connected, excluding usb root hubs
UsbManager usbManager = (UsbManager) getSystemService(Context.USB_SERVICE);
UsbDevice device;
UsbDeviceConnection connection;
HashMap<String, UsbDevice> usbDevices = usbManager.getDeviceList();
if(!usbDevices.isEmpty())
{
    boolean keep = true;
    for(Map.Entry<String, UsbDevice> entry : usbDevices.entrySet())
    {
        device = entry.getValue()
        int deviceVID = device.getVendorId()
        int devicePID = device.getProductId()
        if(deviceVID != 0x1d6b || (devicePID != 0x0001 || devicePID != 0x0002 || devicePID != 0x0003))
       {
          // We are supposing here there is only one device connected and it is our serial device
          connection = usbManager.openDevice(device);
          keep = false;
       }else
       {
          connection = null;
          device = null;
       }

       if(!keep)
           break;
    }
}

With those objects correctly initialized it is easy to start


// A callback for received data must be defined
private UsbSerialInterface.UsbReadCallback mCallback = new UsbSerialInterface.UsbReadCallback()
{
    @Override
    public void onReceivedData(byte[] arg0)
    {
        // Code here
    }
};

//...
//...
UsbSerialDevice serialPort = UsbSerialDevice.createUsbSerialDevice(device, mConnection);
if(serialPort != null)
{
    if(serialPort.open())
    {
        // Devices are opened with default values, Usually 9600,8,1,None,OFF
        // CDC driver default values 115200,8,1,None,OFF
        serialPort.setBaudRate(115200);
        serialPort.setDataBits(UsbSerialInterface.DATA_BITS_8);
        serialPort.setStopBits(UsbSerialInterface.STOP_BITS_1);
        serialPort.setParity(UsbSerialInterface.PARITY_NONE);
        serialPort.setFlowControl(UsbSerialInterface.FLOW_CONTROL_OFF);
        serialPort.read(mCallback);
    }else
    {
        // Serial port could not be opened, maybe an I/O error or it CDC driver was chosen it does not really fit
    }
}else
{
    // No driver for given device, even generic CDC driver could not be loaded
}

And write what you want to send through serial port!

serialPort.write("Hola!".getBytes());

If you need to use flow control signals just check out this post

UsbSerial now allows USB to SPI bridges

Download the jar file here Actually it is better to add UsbSerial using gradle as described above!!

Happy coding and reach me if you do something nice with UsbSerial! 🙂

Update (03/07/15):
Thanks to Martin Blom now it is possible to use UsbSerial with multi-interface devices (like this). The best way would be

int iface = 0;
UsbSerialDevice serialPort = UsbSerialDevice.createUsbSerialDevice(device, mConnection, iface);